Quantcast
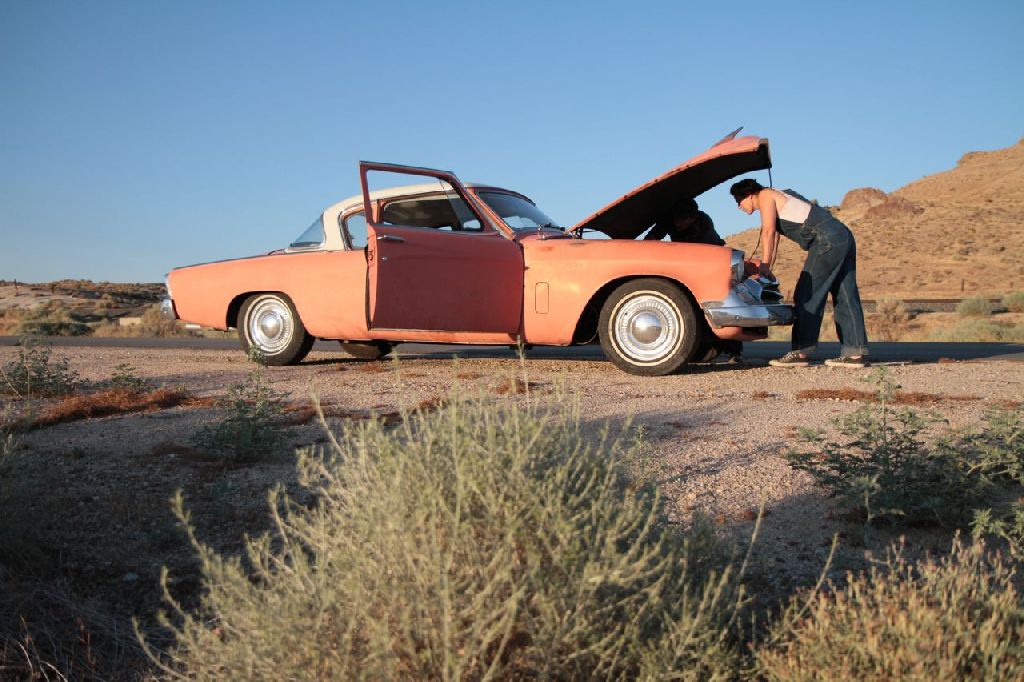
Channel: Grease Girl » mechanic
Viewing all 18 articles
Browse latest View live

learning: yankin’ out an engine

$
0
0

My most current job down at Studebaker Parts and Service is pulling this engine out of a 63′ Lark Wagon (the one I want the body from). Follow the process with me in pictures. Now all ya wrench heads out there – I know this is stupid basic stuff. Just keep in mind there’s lots of us who have no clue! If you’d do it any differently – I’d love to know, leave me a comment!

P.S. I apologize…this is gonna stay incomplete. I was sick for a couple of weeks and they finished the job without me. Now the wagon is gone…I hope somebody does her justice!


transmissions…waaahh!

$
0
0

Unfortunately I’ve been borrowing my Dad’s car since Christmas. I have to admit, during the chilly month of January, I was slightly thankful that I didn’t have to wake up 30-minutes early to go out and de-ice Stude’s windows with hot water. But all-in-all, I miss Stude alot.
waaahh!The Stude’s transmission is mostly shot. How do I know this? First she was kinda slipping out of gear – I would try to step on it and instead of a power boost I would get a power let-down. Then she started to just have less power all together. Then she was having trouble shifting into high gear on the freeway. Last week when I drove her the 25 miles down to the shop, she doesn’t roll away from a red light too easily once she’s heated up.

Luckily, used transmission are affordable and very easy to come by for my engine. Unluckily, it’s taken me months to replace because I just didn’t have the dinero. She will be back up and running in time to head to Las Vegas for Viva in April (which I just registered for today…I’m so excited!)

Transmissions have been a confusing thing for me to understand. Rod and Custom being my magazine of choice, they’ve had some helpful (if not a little over my head) articles in the past number of months. I particularly found one on torque converters helpful, in the August 2008 issue (click here to be directed to the article.) Not that my issue is the torque converter per-se (a torque converter is kind of like a clutch for an automatic transmission)…but it’s a good read to understand a tough issue – bit by bit all different pieces of information begin to fit together inside the ol’ brain!

As I put in the “new” transmission on Stude, I’ll be walking ya’ll through the process and hopefully explaining a bit more as I go along.


Air Filters 101

$
0
0

This sucker's dirty!

This sucker's dirty!

Now – I know that this is totally basic – but I wanted to take the opportunity to show you the air filter that came off my car today. Generally when I think of basic, routine car maintenance, I think “oil, tire pressure, transmission fluid, and is anything leaking.”
As I was at the shop today (P.S. I got the headliner completely finished and the new tranny will be going in tomorrow!…check back soon for those articles) I popped the hood to show off my engine (which is horribly dirty still from when the radiator blew…it was pointed out to me that a guy wouldn’t stand for the dirty-looking engine.)
Sitting there shootin’ the breeze, someone noticed my air filter, so we unscrewed the top and took it out. Evidently, the way to check if you need a new air filter is by holding it up to the light and seeing if any of the light shines through. Not counting the spots where there were holes in mine, there was absolutely no sunlight shining through this sucker. Handy to be offered not one, but two air filters (I love my shop guys!)…we exchanged the dirty one for a clean one. Changing this thing out is as simple as unscrewing a bolt.
Shiny and new!

Shiny and new!


Since I don’t know how often these things need changed, I looked it up and found a helpful article online. It says to change it every 20,000 to 30,000 miles (or when dirty). Although I’ve logged thousands of miles during Stude’s first year on the road – her milage is much closer to 10,000 than 20,000. Something tells me that between the extra exhaust my engine spouts out combined with what I’m guessing is probably increased air intake due to increased engine size – my car’s air filter will need to be changed more often than the average car. Thank goodness my car’s not average!
Tommy likened a dirty air filter to someone putting a cloth up to your mouth and telling you to breath. It would be hard. And the extra work makes for less-effeciant fuel milage – which I had been experiencing…AH-HAH…hopefully now I can get that extra 3-4 mpg back!
So there it is ladies and gents…the low-down on air filters!
Happy Trails!

Grease Girl Diary #1: Engine Boogers

$
0
0

straight six 1I’d been looking forward to Monday for weeks. Yep, this Monday I got to work down at the Studebaker Parts & Service. This is usually a weekly occurrence, but because of another job commitment, I’ve been gone about a month. So basically, my boys down at the shop could’ve given me anything to do and I would’ve been happy!

This week there was a rear-end and an engine block waiting to be cleaned. Any time I get to shine something down to metal I’m always reminded of spending time with my dad in the garage as a little girl. I would take out a drawer of odd-n-in nuts and bolts and shine them one by one on the polishing wheel till they sparkled. Nowadays the polishing wheel bores me pretty quickly, but I still like making things shine.

The rear-end looked easiest, so I tackled that one first. Which was simple enough (Especially with a borrowed “space suit” from Amir, fluorescent orange hat, and safety goggles to keep me clean…ya should’ve seen me, was I ever a sight!) Honestly I was a little scared to touch the engine. I’m still getting to know my way around an engine – and they can still scare me sometimes – you know, I wouldn’t want to hurt it or anything! Which reminds me of a dream I had last week in which my Stude broke down (she’s been parked for the week due to her brakes.) When I looked under the hood (in the dream) the carburetor and air-filter had dropped right through the engine somehow!?! Weird and impossible I know…but I was freaking out in my dream! Anyway…maybe it was because of the dream…maybe because the inside of an engine is still a secret to me…but I felt a little intimidated to approach this lil’ straight-six.

By the time lunch was over that engine was callin’ my name. So I donned some gloves and went to it. And you know…as soon as you start gettin’ yer hands greasy in various parts of a car, those parts lose their scariness. So even though this was more or less just elbow-grease work, I was learning things while I was at it.

The engine was cleaning up pretty nicely when I asked Tommy how it was looking. He pointed to some sludge hidden down under the camshaft and in the compartments with the valve springs. Armed with gasoline and Purple Power I set to get rid of all that sludge…it really is ugly stuff. As I was reaching my finger up and around the valve springs, I was pulling out long gooey bits of engine sludge – and all the sudden I felt like a Mom cleaning the boogers out of her kid’s nose. It’s intimate, it’s messy, and there might be some crying involved.

I wanted to cry when I was having that bad dream about Stude. She is my baby. Maybe I can’t snuggle up to her 383, but I sure do feel the love when I sit behind the wheel.

That straight-six did get cleaned…look for Diary #2 as it comes together and I learn all about pistons!


Wrench like a Girl: Video #1 – Changing Distributor Wires

$
0
0

With so many fun things to do lately, I’ve had trouble doing the writing for the little mechanic issues that have come up with Stude! And since creating a resource for you ladies (and gentlemen) who might also want to work on cars or understand them better is important to me – I thought I’d give videos a try. Let me know what ya think about this format!

Topic: I’ll be changing out the distributor wires (aka ignition wires, spark wires).

Diagnosis: This problem was first brought to my attention by a friend who pointed out the gaping hole in the wire casing. And only then did it really register how uneven my idle was and how much power I’d lost in my engine! Keep in  mind that these wires are carrying the electricity into the engine. Without these babies there would be no spark to ignite the gas within your engine chamber! Due to my damaged wire, my engine was not firing on all 8 cylinders – no bueno!

Parts: I picked up a new set of ACDelco wires from C&C Automotive Distributors in Long Beach. Cost: $40.68

Tools: Really just the new parts and your hands. I also needed an Allen wrench to undo the hex bolts on the part that was keeping my wires organized – as well as a couple new zip ties to keep the new wires away from my roomy headers – and a wax pencil or something like that to label the boots to their corresponding spark plug (this doesn’t have to be done, as they’ll be changed 1 at a time…but it was a 2nd security measure for me).

Time to do it: 1 hour. Could be less,but since I had those special wire holders it took some extra time.


Changing a Tire 101

$
0
0

how-to change a tire

Once I’d decided to start gettin’ my hands greasy – the first thing I went for was the tire. It couldn’t be too hard to take a tire on and off, right? Right! Changing a tire is as easy as 1-2-3!


1. Gather all your tools and jack your car up.

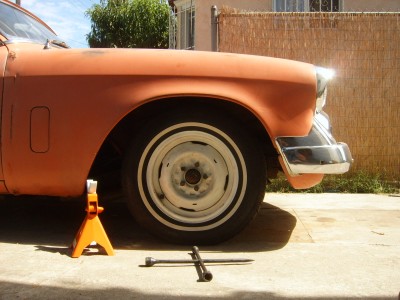
Tools for changing a tireMost modern cars come with a spare tire, a lug wrench, and a jack of some sort. Look in all of the nooks in your trunk – they’ll probably be there. My Studebaker certainly didn’t come with these, but I’ve got them back there now (along with a pair of jumper cables!)
A note about jacks. A jack is a metal contraption that when worked correctly lifts part of your car off the ground. There are a number of varieties of jacks and they all work slightly differently. Most cars are equipped with small scissor jacks. I carry a small floor jack with me in my Stude though. You need to find out what sort of jack you’ve got and read the instructions on how its safely operated. Do this now…don’t wait for an emergency!
Before operating the jack, you need to know where to place it under your car. First of all, you’re gonna want to be on a flat surface with your car in park (with e-brake on if ya’ve got one)! It’s also a good idea to put a wood block or other such thing on the front or back of the tire that is diagonal from the tire you’ll be changing. This helps to keep it from rolling and whatnot.
When you’re ready to place your jack, you want to look for a solid part of the car, or the chassis. The chassis is like the metal skeleton of the car. You never want to put it on the bottom of the engine or gas tank or the edge of the car body. I usually place it close to the tire I’m changing. But don’t jack it up yet, first we’ve got to start removing the tire.

2. Remove tire.

Tire’s usually have 4 or 5 lug nuts holding the tire in place. (If you don’t see these lug nuts, you may need to remove a hubcap.) The lug nuts need to be loosened before jacking the wheel up. Otherwise the wheel would just spin when a turning force is put on the nut!
Gather your lug wrench. The most common lug wrench is in the shape of an X kinda – with a different size on each of its 4 ends. This is a handy set-up because it’ll give you a socket that will fit your tire’s size of bolt and it’s also designed in a way that you can get significant leverage with! You could also choose to carry a breaker bar or something like that in your trunk, but this one tool should be all you need.
Once you find the correct fit to your tire’s lug nut you can start by loosening one. And if you’re in doubt about which direction to turn it – remember the saying “Lefty Lousy, Righty Tighty.” This saying works for everything from the hose faucet to your tire lug nut. If the nut seems hard to loosen – be sure you’re using good leverage on your lug wrench. One hand should be pushing down and the other pulling up.
After all the lug nuts are loosened. You can lift your car using the positioned jack. Safety note: when you’ve got a car jacked up, remember that the placement of the car depends on that jack holding it there. Don’t put yourself in any positions where it could come falling down on you. If you want to be extra safe you can place jack-stands underneath – but that isn’t really necessary for a quick, simple tire change.
With the car lifted, you can finish taking off lug nuts (be sure to put them somewhere they won’t get lost or roll away!) At this point you can lift the tire off its bolts and place it to the side.

3. Put new tire on.

star pattern how to put on a tireWhen you’ve got the replacement tire in hand, take note of where the holes are that the bolts will go through. Kind of match that pattern with the pattern placement you see on the car. With those matched, you won’t have to hold the tire in the air as long! Lift up your tire and place it on the bolts.
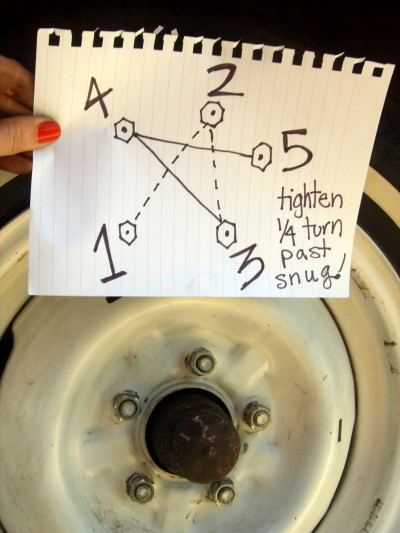
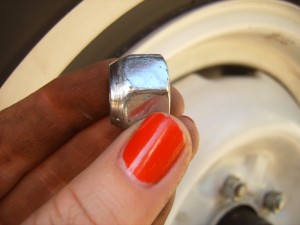
When you’re putting the bolts back on, you want to put them on in a “star” pattern as seen in the picture. Replacing the lug nuts in this pattern will help the tire remain even and safe….which is really important! As you replace the lug nut onto the bolt, take note of the different sides of the lug nut. You want the angled side to be closest to the rim.SUC56658
I use my hands to put each lug nut on most of the way, and then tighten with my hands until snug (following the star pattern.) At this point you can lower your car back down to the ground and remove the jack. With the tire on the ground, use your lug wrench in a star pattern to tighten each bolt to about ¼ turn past “snug.”
If there’s a hubcap put that back on and put your tools back in the trunk. Now you’re ready to roll!
So just because you might never have changed a tire, doesn’t mean you can’t! If you’ve never changed a tire before reading this article – make a date with your car and get a little acquainted! Imagine how good you’ll feel when being stranded on the roadside isn’t on the list of things to be scared of.
A few more notes…

  • Caring for your tires should be a part of your basic car maintenance. Be sure to check your tire pressure every month. I keep a little mini-guage in my car with me. You can find what pressure they’re supposed to be at by looking at the tire just outside the rim you’ll see little lettering that will tell you somewhere in there how much “PSI” it should have. Having deflated tires means less gas-milage and more tire-wear!
  • Rotate your tires about every 8,000 miles. I put this on my once-a-year calendar, but the more fastidious might want to do it twice a year.
  • With vintage hubcaps like those on my Studebaker, I suggest having aSUC56666rubber mallet to ensure these are on snug – its quite hard to do with just the palm of your hand. Once I failed to do this and it resulted in my hubcap popping off as I drove over a bump – which might not be so bad, but when it hit and scratched the door of a new shiny Mercedes it wasn’t very fun to deal with!
  • I recently filmed a short TV segment, teaching a lady to do just this (change her tire!) As we were doing this using my Studebaker as our tire-strandedchanging prop, I noticed that the inner part of my front tires were extremely worn down (tire-alignment is an issue for another article!) I vowed to fix this by going to the tire shop first thing the next morning. What happened that night? That’s right, I blew a tire…on the freeway! Luckily I was already in the far right lane and was able to get on a very small shoulder out of harm’s way (just barely)! This was not a safe spot to put these skills to the test, so I exited my car via the passenger door, stood off to the side of the embankment, and called AAA. Stude was delivered to my driveway where I took the rims off, shopped for 2 new tires, and then did a full 4-tire rotation!

Here’s hoping you won’t have to deal with a blowout! Until next time,

Happy Trails!


Exhaust 101: How-To Choose A New Exhaust System

$
0
0

exhaust.grease girl.underwithheart, car, auto exhaust systemThe best way I can explain what an exhaust system is to your car is its like how your car breathes. When I started driving my Studebaker three years ago, I knew the exhaust system would only be temporary. It was transplanted from a different model Studebaker and had been cut and pieced together to pseudo-fit into mine. But I just figured a pipe was a pipe and couldn’t make too much difference.

About six months ago the years of dragging my mufflers over any bump I passed payed off in a huge gaping hole in one of my mufflers! This is when I really began to be serious about redoing my exhaust system. Not only did the muffler have a hole, but the headers also looked like they had holes where the four tubes lead into the connector. Added to this, my header gaskets were blown, which led to more noise in an already noisy car and a general unhappiness of my engine.

torn.muffler.exhaust.system, custom exhaust how-to

The problem with putting a new exhaust system onto Stude was that I didn’t understand exhausts. How was I supposed to choose new headers, new mufflers, what size of pipe to run, and where to run it out of my car?!? Talking with lots of car friends began to give me a little understanding.Although…I’m seriously still getting my bearings on what all this means, so if any of my information is incorrect, please add your two cents!

Headers. Headers are the pipes that come out of engine block. If you’ve got a V8, you’ll have 8 pipes. Everyone seems to have their favorite style of headers. Some of the reasons are nostalgia. Some of the reasons have to do more with performance. I’ll go into more detail about headers in Headers 101 article.

Mufflers. Mufflers are joined into the exhaust pipe closer to where the pipe ends. They “muffle!” There’s all sorts of different mufflers and they vary in terms of what pitch of sound, how much sound, crackling, etc. Air flow is affected by the muffler also. Some mufflers are designed to slow it down a little, others let it pass right on by. I’ll go into more detail about mufflers in Mufflers 101 article.

Size of Pipe. It seems to me that the larger the pipe, the quicker the flow and deeper the sound. Not only sound is an issue here though, you’ve also got to consider more of the theory of exhaust…and that’s got everything to do with gases leaving your engine, heat, and pressure. You’ll see high performance engines with open headers, meaning there is no pipe/muffler after the header, and that’s thought to be the quickest exit of exhaust thereby increasing horsepower.

Where to run your pipe. This has to do both with performance, as indicated above by open headers. But also has a lot to do with style as well as sound. My previous set up had the pipes coming out the sides of the car just in front of the rear wheels. Another option at the sides is what’s called Lakes pipes. These come out just after the front tire and run parallel to the bottom edge of the car until they stop somewhere before the rear tire. Then there’s straight exhaust that just runs straight out to the back. Some systems join the pipe in the middle so there’s only one exit pipe. Other systems run them straight back. Others connect in the middle with an “H” or “Y” configuration (this has to do with even-ing out the pressure from either side) and then continuing onto two separate exit pipes.

In customizing the Studebaker exhaust, working with a small-block Chevy 383 engine, here’s what we ended up doing. I got to take part in every bit of this process, but really, it was by the help, hard work, and expertise of the guys over at B&C Industries as well as Matt from Department of Customz that made my new exhaust system possible…thank you fellas!

new.blockhugger.headers, custom exhaust, small block Chevy V8, B&C Industry

I already had block-hugging headers and we decided to keep the same, although I considered looking for an old pair of rams-horn style ones. The new custom headers that they made for me over at B&C Industries were of a slightly different configuration than I had – the difference being that the two middle pipes set into the connector-tube came to the inner-side and the outer pipes were in front.

custom.exhaust.howto.underside.straighpipes.B&C Industry, glasspack, muffler, headers, small block Chevy V8

We ran a 2 1/2 inch pipe straight to the back. Tucking it in next to the driveline was a tight squeeze, and running it above the rear axle was even tighter – but it all was worth it because now the profile of the Stude is completely pipe-free on the bottom! All the bends in the pipe were are what’s called a mandrel-bend. This means that when the tube is curved it stays a completely continuous diameter. Flat-bends have ridges in them or change diameter. Thereby affecting the out-pressure of the exhaust system. The high-tech equipment they’ve got over at B&C Industries made mandrel bends possible.

exhaust.greasegirl.headers working Grease Girl Mechanic, small block Chevy V8, block hugging headers, custom headers, exhaust systemA simple straight glasspack muffler design was used that’s 14 inches in length. Glasspack’s are essentially a baffled tube inside a larger tube with fiberglass in between. This style of muffler gives a nice crackling sort of noise.

Check back soon for the How-To’s for the actual replacement of the system on the car, as well as following the process of making mufflers and making custom headers.

I’ve learnt much through this whole process (and am still learning) but I am definitely impressed with how differently my car sounds, feels, and handles! Not knowing how much an exhaust system affected a car, I’d put this job off for far too long! It almost feels like I’m driving a different car. Check out the end results for yourself in the videos below. I can’t thank the fellas over at B&C Industries enough for all of their help and time! They’ve got a fully-equipped shop if you’re looking to have a line of headers, mufflers, or tubes produced!

B & C Industries
538 E Central Park Avenue South
Anaheim, CA 92802-1472
(714) 635-3622
bcindustriesinc.com
Department of Customz
Anaheim, CA
714-284-0004
www.DepartmentofCustomz.com

Learning How-To Gap Spark Plugs

$
0
0

how to change spark plugs.02

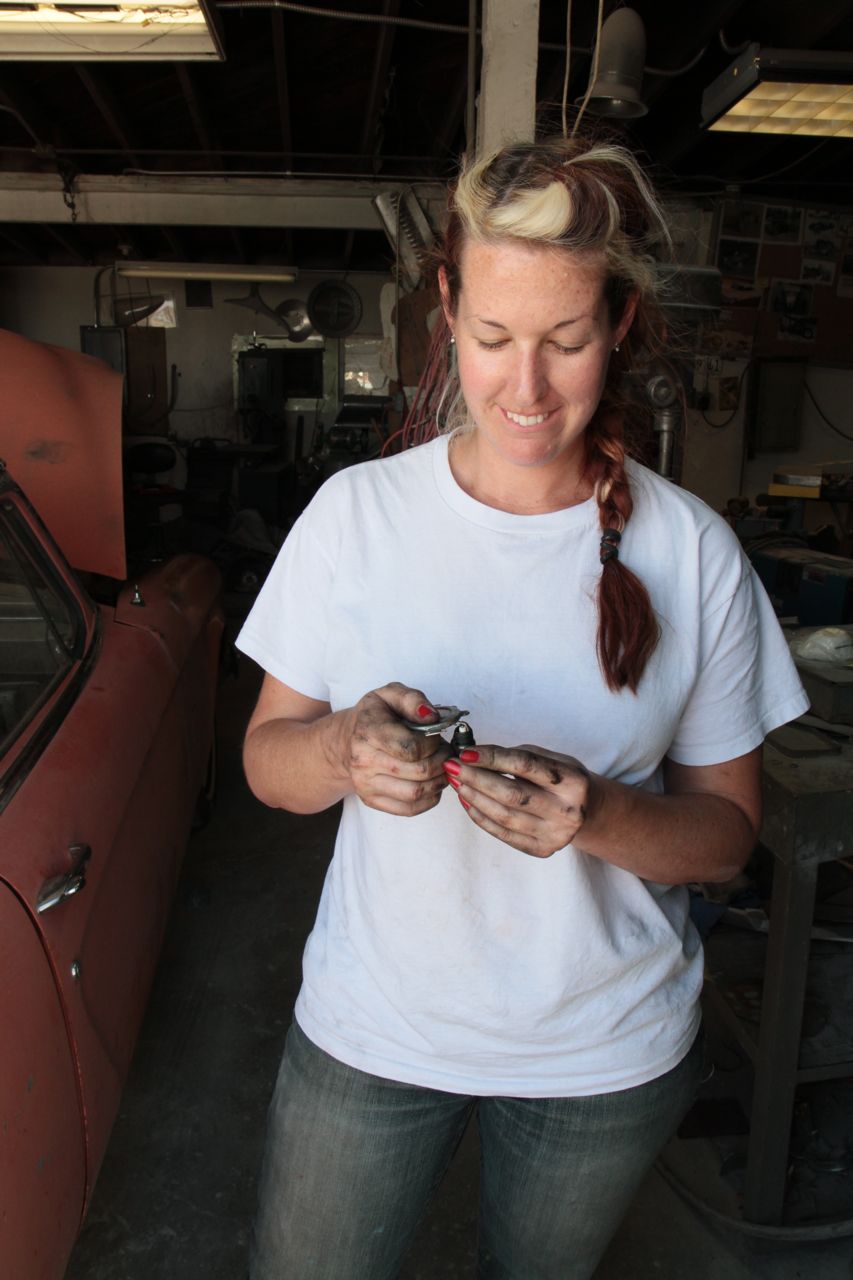
I’ve known for awhile that I needed to change the spark plugs in my Studebaker. But I’d heard things. Things like you could break the plug inside your motor if you did it wrong and to be sure to tighten the plugs to the correct tension. So although I knew they should be changed, I was scared to do it on my own, and my spark plugs in there were working…right???

As I’m learning, I’m seeing that spark plugs (although they don’t cost much and are small little things) are a major, MAJOR component of your engine. Without ‘em, your engine wouldn’t run. Without ‘em working at their best, your engine won’t run at its best.

Grease Girl Learning How-To Change Spark PlugsTools to Gap A Spark Plug

So as part of last weekend’s wrenching adventure up at Gene Winfield’s in Mojave, I changed my spark plugs…for the very first time! Gasp! The fellow at the local parts store recommended Autolite over ACDelco plugs which I had been running. Then, when he informed me the gap for my application was .052 I was surprised, and a little confused. Gap…what?!?

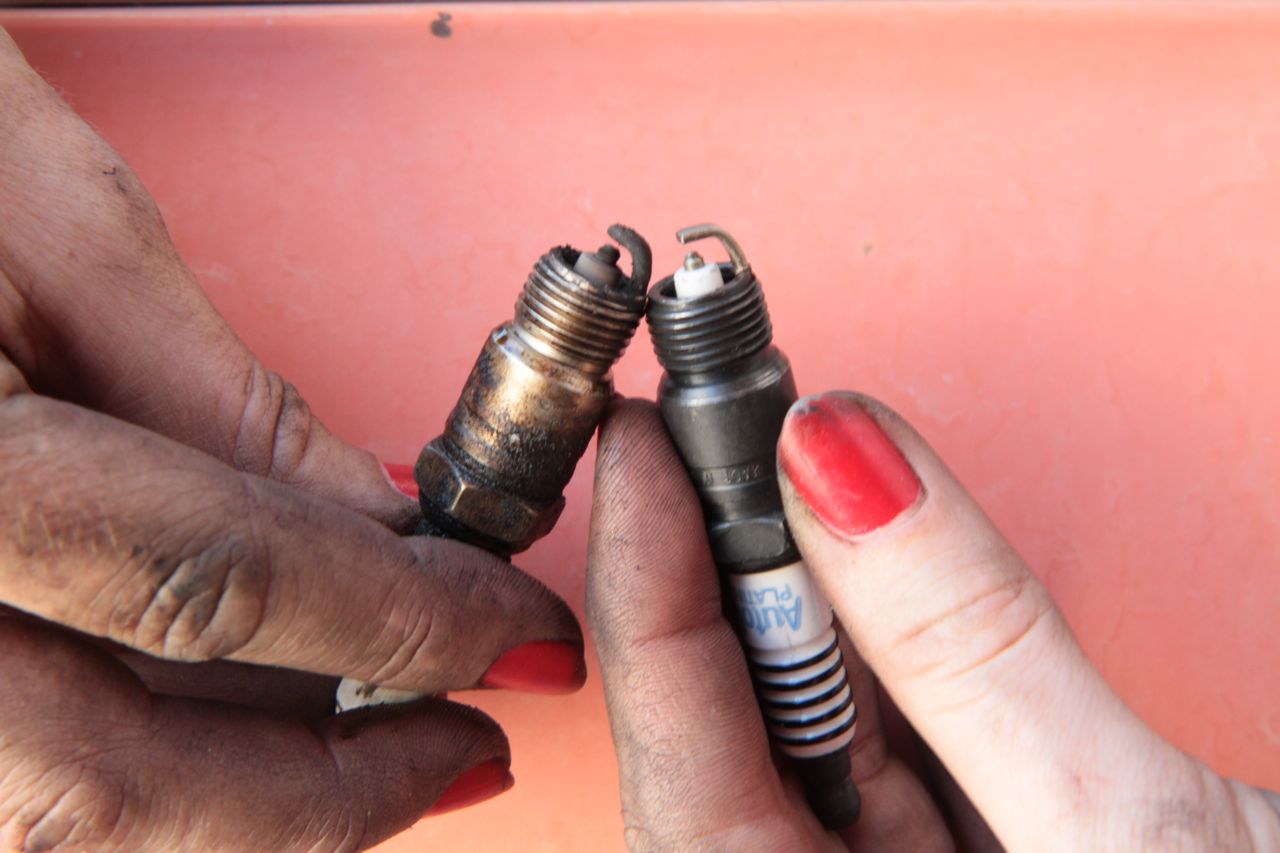
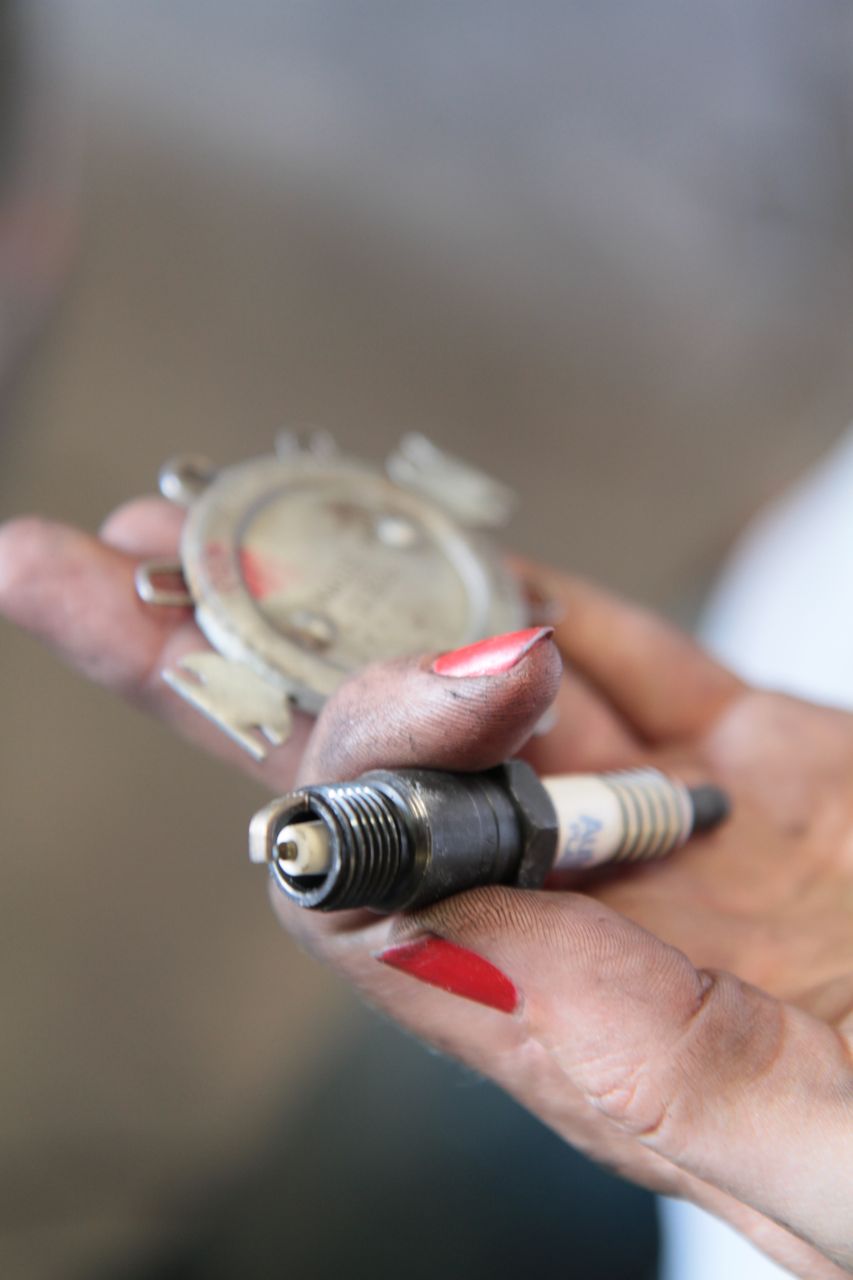
Old and New Spark Plugs

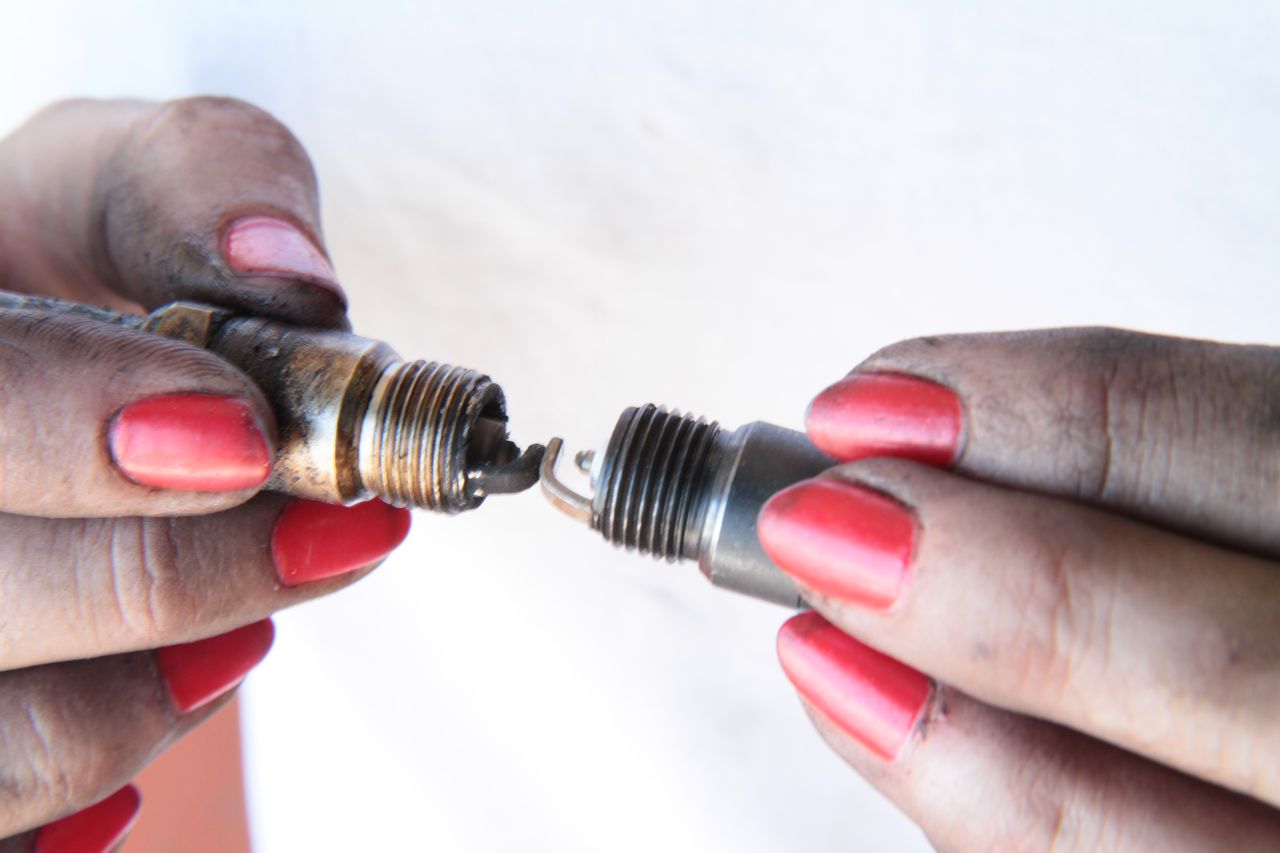
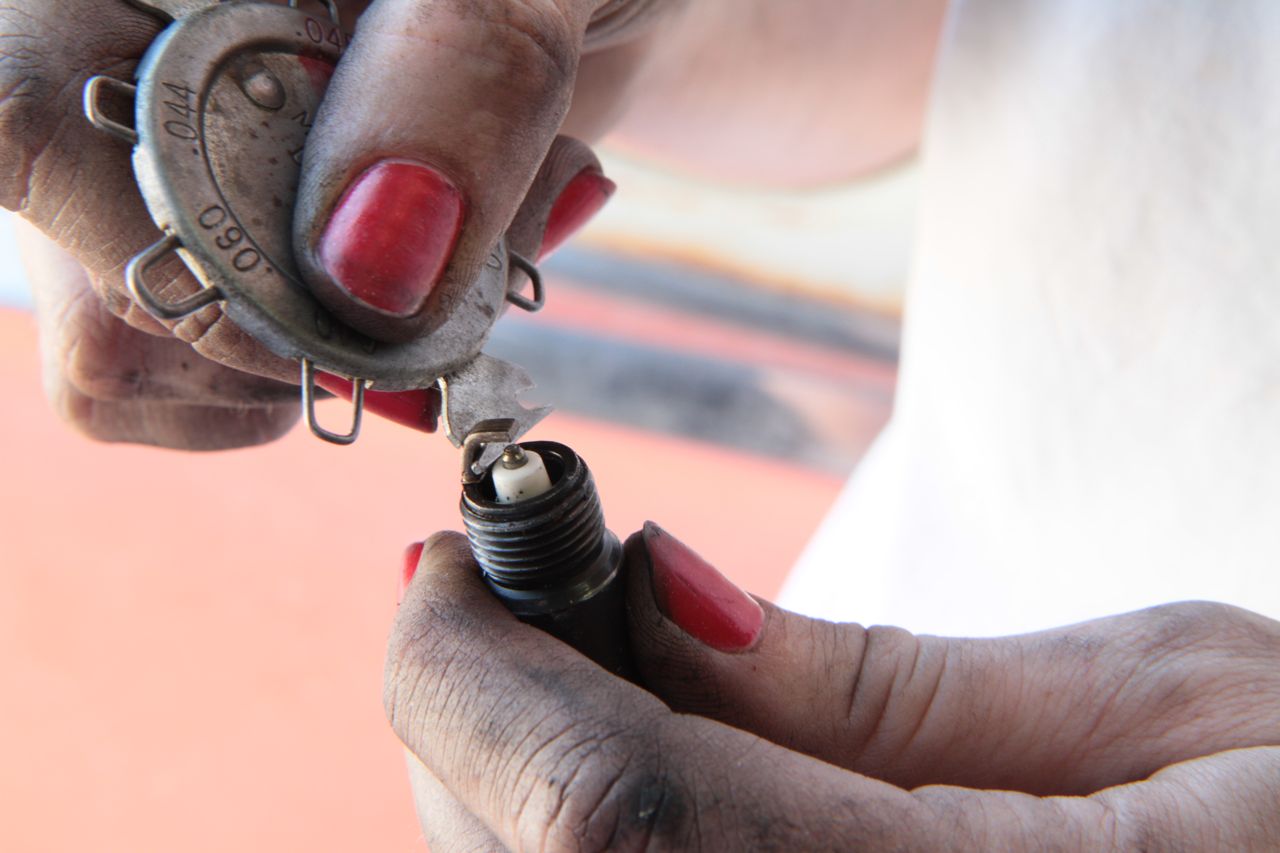
While perhaps some people just throw a set of spark plugs in their engine – if you want your engine to run at its best, you’ve got to adjust the spark plug gap prior to putting them in. So what is a spark plug gap and how do you set it? The gap is referring to the space between the center electrode (that comes up out of the middle) and the ground electrode (that curves around the top).

Measuring The Gap of A Spark Plug Electrode

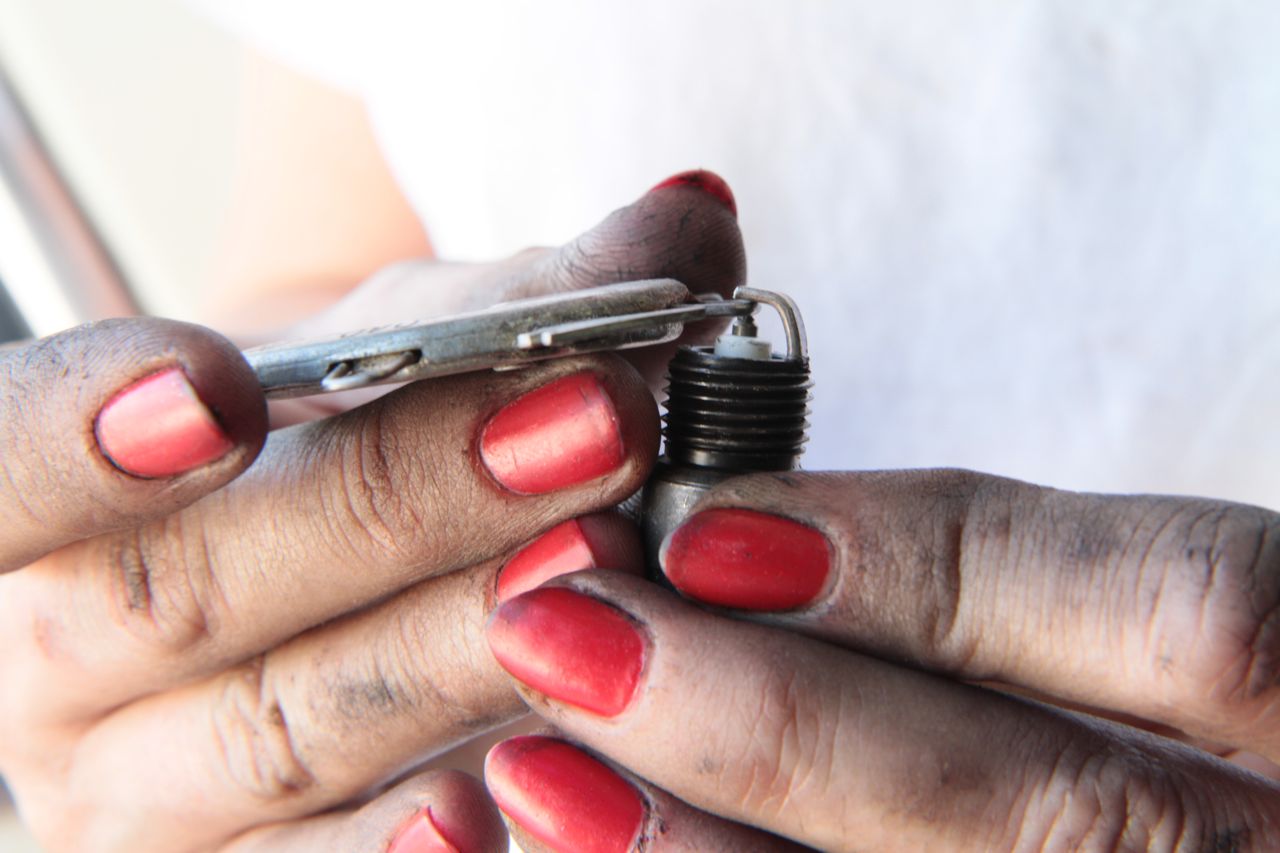
This space is measured using a special measuring tool. The most common tool you’d find to do this is called a taper gap gauge – and is that silver-dollar looking thing you often find by the register in auto parts store. The edge of that “coin” is tapered and its thickness corresponds with the numbers engraved on the top and bottom. Many people feel, although this is a simple tool, that a different style of tool works better – which is the one I used and pictured here. Rather than being tapered its got different thicknesses of wire. So although my tool didn’t have a .052 inch wire thickness, it did have a .050 and a .054. So we used it by determining that the .050 easily slid between the two electrodes and the .054 would not fit between them.

Correctly Gapping A Spark Plug

As we adjusted the gap in each spark plug, sometimes the ground electrode would have to be pulled up to widen the gap and other times it would have to be pushed down slightly to shrink the gap. When you’re adjusting the ground electrode, be sure that you don’t hit or press against the center electrode. It only takes a little bit of pressure to move it – so after a little pressure use your tool to check the gap again until you’ve got the perfect fit!

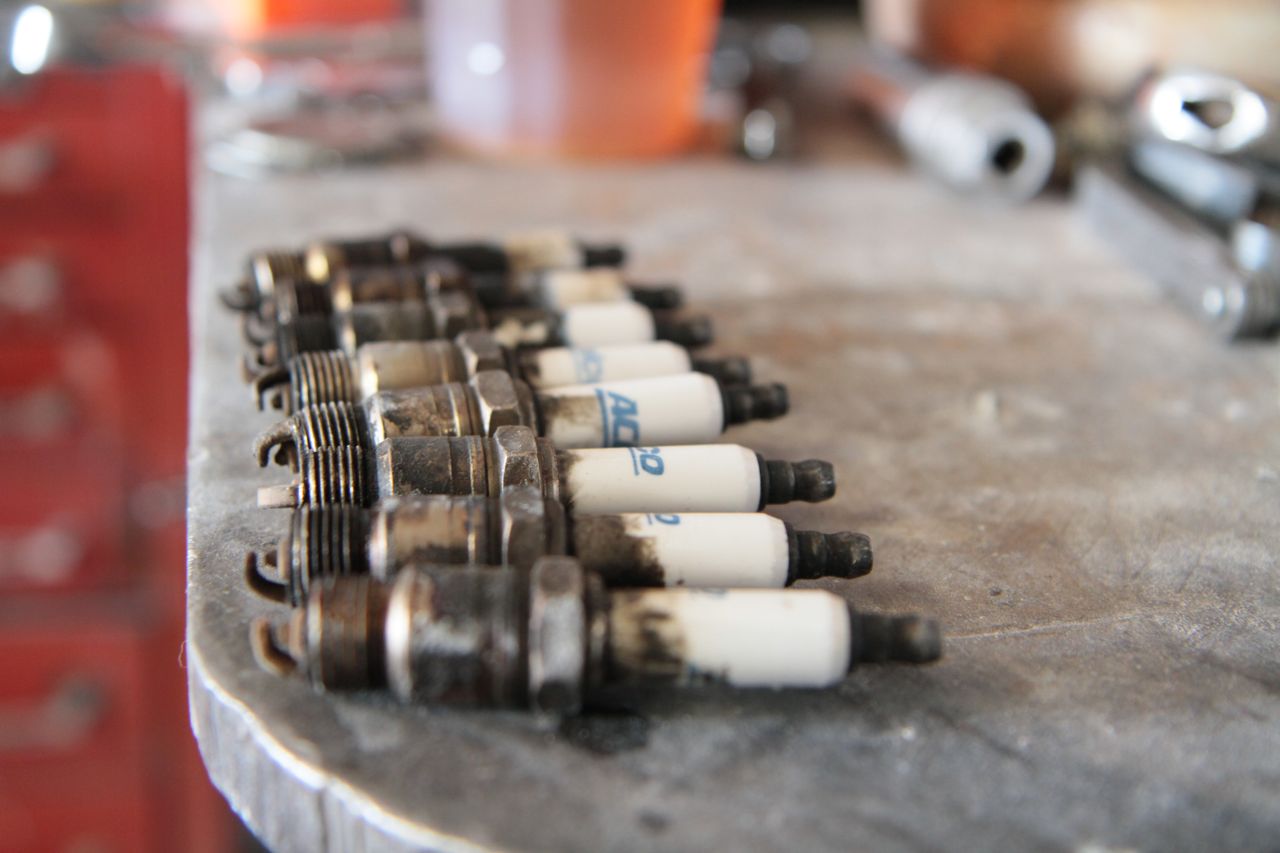
Dirty Old Spark Plugs

Who knew such a simple thing could make such a big difference? I certainly didn’t. I’d imagine this was one of the easiest things I could do (without even getting my hands too greasy) to make my engine run better. Sparkin!


Back In The Fast Lane!

$
0
0

Outside Gene Winfield's Shop, hot rods

They say distance makes the heart grow fonder. Since Stude’s spent the past 3 months suntanning her metal in the Mojave sun outside Gene Winfield’s shop…I’ve grown fonder then ever. The great news is (drum-roll please,) she’s back on the road!!! Not only is she back, she’s running better than ever!

Grease Girl and Lori Hard At Work, girl mechanic, hot rod, studebaker, transmission

Replacing the transmission was the biggest job that needed to be done. Saving money and finding the right transmission is what took the bulk of the time. Luckily I had good friends and lots of help through the process…thanks to all who were involved! I ended up having a great guy, Rick Annis in Phoenix, AZ, rebuild a 700R4 for me. Then my car club pal, Lori, and I took the 700R4 up to Mojave to meet Stude. Up at Gene’s we got a lot of help from Bart putting it in. With Bart having a lot of experience in engine tuning he wouldn’t let my car out of his sight with just a new transmission – so we worked on getting Stude’s little 383 small block up to par also.

Roadside TV Cable Adjustments, girl mechanic, hot rod, studebaker

The first weekend we did a lot of work but things just weren’t right. It was hard leaving her there again, but I’m glad I did – because this past weekend we went up again and completed the work and it’s made a huge difference!  Here’s a list of the stuff we accomplished:

  • Newly rebuilt 700R4 put in
  • Fix TV Cable bracket
  • Drive shaft adjustment
  • Change spark plugs
  • Reroute distributor plugs
  • Tune carburetor
  • Adjust/lash valves
  • Put in T-bolts for valve covers
  • Stabilize battery holder
  • Clean engine
  • Grease Girl Under the Hood, engine tuning, hot rod, girl mechanic

    It was a lot of work, but a lot of fun! Especially with Bart and Lori by my side. Needless to say, I learned a ton through this process (such as How-To Gap A Spark Plug) and will be writing more to fill ya’ll in. I just couldn’t wait to share the good news.

    Driving Off Into The Sunset, grease girl, hot rod

    Each time someone’s head turns to see what’s making that awesome sound or wondering what’s under the hood of that old ’55 Studebaker, I can’t help but smile. I had no idea I’d grown this in love with speed (and with Stude of course!) This story ends happily with girl and car driving off into the California sunset…armed with more car knowledge, more horsepower, and of course more grease under her nails! Until next time, happy trails!


    learning: yankin’ out an engine

    $
    0
    0

    My most current job down at Studebaker Parts and Service is pulling this engine out of a 63′ Lark Wagon (the one I want the body from). Follow the process with me in pictures. Now all ya wrench heads out there – I know this is stupid basic stuff. Just keep in mind there’s lots of us who have no clue! If you’d do it any differently – I’d love to know, leave me a comment!

    P.S. I apologize…this is gonna stay incomplete. I was sick for a couple of weeks and they finished the job without me. Now the wagon is gone…I hope somebody does her justice!

    The post learning: yankin’ out an engine appeared first on Grease Girl.

    transmissions…waaahh!

    $
    0
    0

    Unfortunately I’ve been borrowing my Dad’s car since Christmas. I have to admit, during the chilly month of January, I was slightly thankful that I didn’t have to wake up 30-minutes early to go out and de-ice Stude’s windows with hot water. But all-in-all, I miss Stude alot.
    waaahh!The Stude’s transmission is mostly shot. How do I know this? First she was kinda slipping out of gear – I would try to step on it and instead of a power boost I would get a power let-down. Then she started to just have less power all together. Then she was having trouble shifting into high gear on the freeway. Last week when I drove her the 25 miles down to the shop, she doesn’t roll away from a red light too easily once she’s heated up.

    Luckily, used transmission are affordable and very easy to come by for my engine. Unluckily, it’s taken me months to replace because I just didn’t have the dinero. She will be back up and running in time to head to Las Vegas for Viva in April (which I just registered for today…I’m so excited!)

    Transmissions have been a confusing thing for me to understand. Rod and Custom being my magazine of choice, they’ve had some helpful (if not a little over my head) articles in the past number of months. I particularly found one on torque converters helpful, in the August 2008 issue (click here to be directed to the article.) Not that my issue is the torque converter per-se (a torque converter is kind of like a clutch for an automatic transmission)…but it’s a good read to understand a tough issue – bit by bit all different pieces of information begin to fit together inside the ol’ brain!

    As I put in the “new” transmission on Stude, I’ll be walking ya’ll through the process and hopefully explaining a bit more as I go along.

    The post transmissions…waaahh! appeared first on Grease Girl.

    Air Filters 101

    $
    0
    0
    This sucker's dirty!

    This sucker’s dirty!

    Now – I know that this is totally basic – but I wanted to take the opportunity to show you the air filter that came off my car today. Generally when I think of basic, routine car maintenance, I think “oil, tire pressure, transmission fluid, and is anything leaking.”
    As I was at the shop today (P.S. I got the headliner completely finished and the new tranny will be going in tomorrow!…check back soon for those articles) I popped the hood to show off my engine (which is horribly dirty still from when the radiator blew…it was pointed out to me that a guy wouldn’t stand for the dirty-looking engine.)
    Sitting there shootin’ the breeze, someone noticed my air filter, so we unscrewed the top and took it out. Evidently, the way to check if you need a new air filter is by holding it up to the light and seeing if any of the light shines through. Not counting the spots where there were holes in mine, there was absolutely no sunlight shining through this sucker. Handy to be offered not one, but two air filters (I love my shop guys!)…we exchanged the dirty one for a clean one. Changing this thing out is as simple as unscrewing a bolt.

    Shiny and new!

    Shiny and new!

    Since I don’t know how often these things need changed, I looked it up and found a helpful article online. It says to change it every 20,000 to 30,000 miles (or when dirty). Although I’ve logged thousands of miles during Stude’s first year on the road – her milage is much closer to 10,000 than 20,000. Something tells me that between the extra exhaust my engine spouts out combined with what I’m guessing is probably increased air intake due to increased engine size – my car’s air filter will need to be changed more often than the average car. Thank goodness my car’s not average!
    Tommy likened a dirty air filter to someone putting a cloth up to your mouth and telling you to breath. It would be hard. And the extra work makes for less-effeciant fuel milage – which I had been experiencing…AH-HAH…hopefully now I can get that extra 3-4 mpg back!
    So there it is ladies and gents…the low-down on air filters!
    Happy Trails!

    The post Air Filters 101 appeared first on Grease Girl.

    Grease Girl Diary #1: Engine Boogers

    $
    0
    0

    straight six 1I’d been looking forward to Monday for weeks. Yep, this Monday I got to work down at the Studebaker Parts & Service. This is usually a weekly occurrence, but because of another job commitment, I’ve been gone about a month. So basically, my boys down at the shop could’ve given me anything to do and I would’ve been happy!

    This week there was a rear-end and an engine block waiting to be cleaned.Any time I get to shine something down to metal I’m always reminded of spending time with my dad in the garage as a little girl. I would take out a drawer of odd-n-in nuts and bolts and shine them one by one on the polishing wheel till they sparkled. Nowadays the polishing wheel bores me pretty quickly, but I still like making things shine.

    The rear-end looked easiest, so I tackled that one first. Which was simple enough (Especially with a borrowed “space suit” from Amir, fluorescent orange hat, and safety goggles to keep me clean…ya should’ve seen me, was I ever a sight!) Honestly I was a little scared to touch the engine. I’m still getting to know my way around an engine – and they can still scare me sometimes – you know, I wouldn’t want to hurt it or anything! Which reminds me of a dream I had last week in which my Stude broke down (she’s been parked for the week due to her brakes.) When I looked under the hood (in the dream) the carburetor and air-filter had dropped right through the engine somehow!?! Weird and impossible I know…but I was freaking out in my dream! Anyway…maybe it was because of the dream…maybe because the inside of an engine is still a secret to me…but I felt a little intimidated to approach this lil’ straight-six.

    By the time lunch was over that engine was callin’ my name. So I donned some gloves and went to it. And you know…as soon as you start gettin’ yer hands greasy in various parts of a car, those parts lose their scariness. So even though this was more or less just elbow-grease work, I was learning things while I was at it.

    The engine was cleaning up pretty nicely when I asked Tommy how it was looking. He pointed to some sludge hidden down under the camshaft and in the compartments with the valve springs. Armed with gasoline and Purple Power I set to get rid of all that sludge…it really is ugly stuff. As I was reaching my finger up and around the valve springs, I was pulling out long gooey bits of engine sludge – and all the sudden I felt like a Mom cleaning the boogers out of her kid’s nose. It’s intimate, it’s messy, and there might be some crying involved.

    I wanted to cry when I was having that bad dream about Stude. She is my baby. Maybe I can’t snuggle up to her 383, but I sure do feel the love when I sit behind the wheel.

    That straight-six did get cleaned…look for Diary #2 as it comes together and I learn all about pistons!

    The post Grease Girl Diary #1: Engine Boogers appeared first on Grease Girl.

    Wrench like a Girl: Video #1 – Changing Distributor Wires

    $
    0
    0

    With so many fun things to do lately, I’ve had trouble doing the writing for the little mechanic issues that have come up with Stude! And since creating a resource for you ladies (and gentlemen) who might also want to work on cars or understand them better is important to me – I thought I’d give videos a try. Let me know what ya think about this format!

    Topic: I’ll be changing out the distributor wires (aka ignition wires, spark wires).

    Diagnosis: This problem was first brought to my attention by a friend who pointed out the gaping hole in the wire casing. And only then did it really register how uneven my idle was and how much power I’d lost in my engine! Keep in  mind that these wires are carrying the electricity into the engine. Without these babies there would be no spark to ignite the gas within your engine chamber! Due to my damaged wire, my engine was not firing on all 8 cylinders – no bueno!

    Parts: I picked up a new set of ACDelco wires from C&C Automotive Distributors in Long Beach. Cost: $40.68

    Tools: Really just the new parts and your hands. I also needed an Allen wrench to undo the hex bolts on the part that was keeping my wires organized – as well as a couple new zip ties to keep the new wires away from my roomy headers – and a wax pencil or something like that to label the boots to their corresponding spark plug (this doesn’t have to be done, as they’ll be changed 1 at a time…but it was a 2nd security measure for me).

    Time to do it: 1 hour. Could be less,but since I had those special wire holders it took some extra time.

    The post Wrench like a Girl: Video #1 – Changing Distributor Wires appeared first on Grease Girl.

    Changing a Tire 101

    $
    0
    0

    how-to change a tire

    Once I’d decided to start gettin’ my hands greasy – the first thing I went for was the tire. It couldn’t be too hard to take a tire on and off, right? Right! Changing a tire is as easy as 1-2-3!

    1. Gather all your tools and jack your car up.

    Tools for changing a tireMost modern cars come with a spare tire, a lug wrench, and a jack of some sort. Look in all of the nooks in your trunk – they’ll probably be there. My Studebaker certainly didn’t come with these, but I’ve got them back there now (along with a pair of jumper cables!)
    A note about jacks. A jack is a metal contraption that when worked correctly lifts part of your car off the ground. There are a number of varieties of jacks and they all work slightly differently. Most cars are equipped with small scissor jacks. I carry a small floor jack with me in my Stude though. You need to find out what sort of jack you’ve got and read the instructions on how its safely operated. Do this now…don’t wait for an emergency!
    Before operating the jack, you need to know where to place it under your car. First of all, you’re gonna want to be on a flat surface with your car in park (with e-brake on if ya’ve got one)! It’s also a good idea to put a wood block or other such thing on the front or back of the tire that is diagonal from the tire you’ll be changing. This helps to keep it from rolling and whatnot.
    When you’re ready to place your jack, you want to look for a solid part of the car, or the chassis. The chassis is like the metal skeleton of the car. You never want to put it on the bottom of the engine or gas tank or the edge of the car body. I usually place it close to the tire I’m changing. But don’t jack it up yet, first we’ve got to start removing the tire.

    2. Remove tire.

    Tire’s usually have 4 or 5 lug nuts holding the tire in place. (If you don’t see these lug nuts, you may need to remove a hubcap.) The lug nuts need to be loosened before jacking the wheel up. Otherwise the wheel would just spin when a turning force is put on the nut!
    Gather your lug wrench. The most common lug wrench is in the shape of an X kinda – with a different size on each of its 4 ends. This is a handy set-up because it’ll give you a socket that will fit your tire’s size of bolt and it’s also designed in a way that you can get significant leverage with! You could also choose to carry a breaker bar or something like that in your trunk, but this one tool should be all you need.
    Once you find the correct fit to your tire’s lug nut you can start by loosening one. And if you’re in doubt about which direction to turn it – remember the saying “Lefty Lousy, Righty Tighty.” This saying works for everything from the hose faucet to your tire lug nut. If the nut seems hard to loosen – be sure you’re using good leverage on your lug wrench. One hand should be pushing down and the other pulling up.
    After all the lug nuts are loosened. You can lift your car using the positioned jack. Safety note: when you’ve got a car jacked up, remember that the placement of the car depends on that jack holding it there. Don’t put yourself in any positions where it could come falling down on you. If you want to be extra safe you can place jack-stands underneath – but that isn’t really necessary for a quick, simple tire change.
    With the car lifted, you can finish taking off lug nuts (be sure to put them somewhere they won’t get lost or roll away!) At this point you can lift the tire off its bolts and place it to the side.

    3. Put new tire on.

    star pattern how to put on a tireWhen you’ve got the replacement tire in hand, take note of where the holes are that the bolts will go through. Kind of match that pattern with the pattern placement you see on the car. With those matched, you won’t have to hold the tire in the air as long! Lift up your tire and place it on the bolts.
    When you’re putting the bolts back on, you want to put them on in a “star” pattern as seen in the picture. Replacing the lug nuts in this pattern will help the tire remain even and safe….which is really important! As you replace the lug nut onto the bolt, take note of the different sides of the lug nut. You want the angled side to be closest to the rim.SUC56658
    I use my hands to put each lug nut on most of the way, and then tighten with my hands until snug (following the star pattern.) At this point you can lower your car back down to the ground and remove the jack. With the tire on the ground, use your lug wrench in a star pattern to tighten each bolt to about ¼ turn past “snug.”
    If there’s a hubcap put that back on and put your tools back in the trunk. Now you’re ready to roll!
    So just because you might never have changed a tire, doesn’t mean you can’t! If you’ve never changed a tire before reading this article – make a date with your car and get a little acquainted! Imagine how good you’ll feel when being stranded on the roadside isn’t on the list of things to be scared of.
    A few more notes…

    • Caring for your tires should be a part of your basic car maintenance. Be sure to check your tire pressure every month. I keep a little mini-guage in my car with me. You can find what pressure they’re supposed to be at by looking at the tire just outside the rim you’ll see little lettering that will tell you somewhere in there how much “PSI” it should have. Having deflated tires means less gas-milage and more tire-wear!
    • Rotate your tires about every 8,000 miles. I put this on my once-a-year calendar, but the more fastidious might want to do it twice a year.
    • With vintage hubcaps like those on my Studebaker, I suggest having aSUC56666rubber mallet to ensure these are on snug – its quite hard to do with just the palm of your hand. Once I failed to do this and it resulted in my hubcap popping off as I drove over a bump – which might not be so bad, but when it hit and scratched the door of a new shiny Mercedes it wasn’t very fun to deal with!
    • I recently filmed a short TV segment, teaching a lady to do just this (change her tire!) As we were doing this using my Studebaker as our tire-strandedchanging prop, I noticed that the inner part of my front tires were extremely worn down (tire-alignment is an issue for another article!) I vowed to fix this by going to the tire shop first thing the next morning. What happened that night? That’s right, I blew a tire…on the freeway! Luckily I was already in the far right lane and was able to get on a very small shoulder out of harm’s way (just barely)! This was not a safe spot to put these skills to the test, so I exited my car via the passenger door, stood off to the side of the embankment, and called AAA. Stude was delivered to my driveway where I took the rims off, shopped for 2 new tires, and then did a full 4-tire rotation!

    Here’s hoping you won’t have to deal with a blowout! Until next time,

    Happy Trails!

    The post Changing a Tire 101 appeared first on Grease Girl.


    Exhaust 101: How-To Choose A New Exhaust System

    $
    0
    0

    exhaust.grease girl.underwithheart, car, auto exhaust systemThe best way I can explain what an exhaust system is to your car is its like how your car breathes. When I started driving my Studebaker three years ago, I knew the exhaust system would only be temporary. It was transplanted from a different model Studebaker and had been cut and pieced together to pseudo-fit into mine. But I just figured a pipe was a pipe and couldn’t make too much difference.

    About six months ago the years of dragging my mufflers over any bump I passed payed off in a huge gaping hole in one of my mufflers! This is when I really began to be serious about redoing my exhaust system. Not only did the muffler have a hole, but the headers also looked like they had holes where the four tubes lead into the connector. Added to this, my header gaskets were blown, which led to more noise in an already noisy car and a general unhappiness of my engine.

    torn.muffler.exhaust.system, custom exhaust how-to

    The problem with putting a new exhaust system onto Stude was that I didn’t understand exhausts. How was I supposed to choose new headers, new mufflers, what size of pipe to run, and where to run it out of my car?!? Talking with lots of car friends began to give me a little understanding.Although…I’m seriously still getting my bearings on what all this means, so if any of my information is incorrect, please add your two cents!

    Headers. Headers are the pipes that come out of engine block. If you’ve got a V8, you’ll have 8 pipes. Everyone seems to have their favorite style of headers. Some of the reasons are nostalgia. Some of the reasons have to do more with performance. I’ll go into more detail about headers in Headers 101 article.

    Mufflers. Mufflers are joined into the exhaust pipe closer to where the pipe ends. They “muffle!” There’s all sorts of different mufflers and they vary in terms of what pitch of sound, how much sound, crackling, etc. Air flow is affected by the muffler also. Some mufflers are designed to slow it down a little, others let it pass right on by. I’ll go into more detail about mufflers in Mufflers 101 article.

    Size of Pipe. It seems to me that the larger the pipe, the quicker the flow and deeper the sound. Not only sound is an issue here though, you’ve also got to consider more of the theory of exhaust…and that’s got everything to do with gases leaving your engine, heat, and pressure. You’ll see high performance engines with open headers, meaning there is no pipe/muffler after the header, and that’s thought to be the quickest exit of exhaust thereby increasing horsepower.

    Where to run your pipe. This has to do both with performance, as indicated above by open headers. But also has a lot to do with style as well as sound. My previous set up had the pipes coming out the sides of the car just in front of the rear wheels. Another option at the sides is what’s called Lakes pipes. These come out just after the front tire and run parallel to the bottom edge of the car until they stop somewhere before the rear tire. Then there’s straight exhaust that just runs straight out to the back. Some systems join the pipe in the middle so there’s only one exit pipe. Other systems run them straight back. Others connect in the middle with an “H” or “Y” configuration (this has to do with even-ing out the pressure from either side) and then continuing onto two separate exit pipes.

    In customizing the Studebaker exhaust, working with a small-block Chevy 383 engine, here’s what we ended up doing. I got to take part in every bit of this process, but really, it was by the help, hard work, and expertise of the guys over at B&C Industries as well as Matt from Department of Customz that made my new exhaust system possible…thank you fellas!

    new.blockhugger.headers, custom exhaust, small block Chevy V8, B&C Industry

    I already had block-hugging headers and we decided to keep the same, although I considered looking for an old pair of rams-horn style ones. The new custom headers that they made for me over at B&C Industries were of a slightly different configuration than I had – the difference being that the two middle pipes set into the connector-tube came to the inner-side and the outer pipes were in front.

    custom.exhaust.howto.underside.straighpipes.B&C Industry, glasspack, muffler, headers, small block Chevy V8

    We ran a 2 1/2 inch pipe straight to the back. Tucking it in next to the driveline was a tight squeeze, and running it above the rear axle was even tighter – but it all was worth it because now the profile of the Stude is completely pipe-free on the bottom! All the bends in the pipe were are what’s called a mandrel-bend. This means that when the tube is curved it stays a completely continuous diameter. Flat-bends have ridges in them or change diameter. Thereby affecting the out-pressure of the exhaust system. The high-tech equipment they’ve got over at B&C Industries made mandrel bends possible.

    exhaust.greasegirl.headers working Grease Girl Mechanic, small block Chevy V8, block hugging headers, custom headers, exhaust systemA simple straight glasspack muffler design was used that’s 14 inches in length. Glasspack’s are essentially a baffled tube inside a larger tube with fiberglass in between. This style of muffler gives a nice crackling sort of noise.

    Check back soon for the How-To’s for the actual replacement of the system on the car, as well as following the process of making mufflers and making custom headers.

    I’ve learnt much through this whole process (and am still learning) but I am definitely impressed with how differently my car sounds, feels, and handles! Not knowing how much an exhaust system affected a car, I’d put this job off for far too long! It almost feels like I’m driving a different car. Check out the end results for yourself in the videos below. I can’t thank the fellas over at B&C Industries enough for all of their help and time! They’ve got a fully-equipped shop if you’re looking to have a line of headers, mufflers, or tubes produced!

    B & C Industries
    538 E Central Park Avenue South
    Anaheim, CA 92802-1472
    (714) 635-3622
    bcindustriesinc.com
     
     
    Department of Customz
    Anaheim, CA
    714-284-0004
    www.DepartmentofCustomz.com

    The post Exhaust 101: How-To Choose A New Exhaust System appeared first on Grease Girl.

    Learning How-To Gap Spark Plugs

    $
    0
    0

    how to change spark plugs.02

    I’ve known for awhile that I needed to change the spark plugs in my Studebaker. But I’d heard things. Things like you could break the plug inside your motor if you did it wrong and to be sure to tighten the plugs to the correct tension. So although I knew they should be changed, I was scared to do it on my own, and my spark plugs in there were working…right???

    As I’m learning, I’m seeing that spark plugs (although they don’t cost much and are small little things) are a major, MAJOR component of your engine. Without ‘em, your engine wouldn’t run. Without ‘em working at their best, your engine won’t run at its best.


    Grease Girl Learning How-To Change Spark PlugsTools to Gap A Spark Plug

    So as part of last weekend’s wrenching adventure up at Gene Winfield’s in Mojave, I changed my spark plugs…for the very first time! Gasp! The fellow at the local parts store recommended Autolite over ACDelco plugs which I had been running. Then, when he informed me the gap for my application was .052 I was surprised, and a little confused. Gap…what?!?

    Old and New Spark Plugs

    While perhaps some people just throw a set of spark plugs in their engine – if you want your engine to run at its best, you’ve got to adjust the spark plug gap prior to putting them in. So what is a spark plug gap and how do you set it? The gap is referring to the space between the center electrode (that comes up out of the middle) and the ground electrode (that curves around the top).

    Measuring The Gap of A Spark Plug Electrode

    This space is measured using a special measuring tool. The most common tool you’d find to do this is called a taper gap gauge – and is that silver-dollar looking thing you often find by the register in auto parts store. The edge of that “coin” is tapered and its thickness corresponds with the numbers engraved on the top and bottom. Many people feel, although this is a simple tool, that a different style of tool works better – which is the one I used and pictured here. Rather than being tapered its got different thicknesses of wire. So although my tool didn’t have a .052 inch wire thickness, it did have a .050 and a .054. So we used it by determining that the .050 easily slid between the two electrodes and the .054 would not fit between them.

    Correctly Gapping A Spark Plug

    As we adjusted the gap in each spark plug, sometimes the ground electrode would have to be pulled up to widen the gap and other times it would have to be pushed down slightly to shrink the gap. When you’re adjusting the ground electrode, be sure that you don’t hit or press against the center electrode. It only takes a little bit of pressure to move it – so after a little pressure use your tool to check the gap again until you’ve got the perfect fit!

    Dirty Old Spark Plugs

    Who knew such a simple thing could make such a big difference? I certainly didn’t. I’d imagine this was one of the easiest things I could do (without even getting my hands too greasy) to make my engine run better. Sparkin!

    The post Learning How-To Gap Spark Plugs appeared first on Grease Girl.

    Back In The Fast Lane!

    $
    0
    0

    Outside Gene Winfield's Shop, hot rods

    They say distance makes the heart grow fonder. Since Stude’s spent the past 3 months suntanning her metal in the Mojave sun outside Gene Winfield’s shop…I’ve grown fonder then ever. The great news is (drum-roll please,) she’s back on the road!!! Not only is she back, she’s running better than ever!

    Grease Girl and Lori Hard At Work, girl mechanic, hot rod, studebaker, transmission

    Replacing the transmission was the biggest job that needed to be done. Saving money and finding the right transmission is what took the bulk of the time. Luckily I had good friends and lots of help through the process…thanks to all who were involved! I ended up having a great guy, Rick Annis in Phoenix, AZ, rebuild a 700R4 for me. Then my car club pal, Lori, and I took the 700R4 up to Mojave to meet Stude. Up at Gene’s we got a lot of help from Bart putting it in. With Bart having a lot of experience in engine tuning he wouldn’t let my car out of his sight with just a new transmission – so we worked on getting Stude’s little 383 small block up to par also.

    Roadside TV Cable Adjustments, girl mechanic, hot rod, studebaker

    The first weekend we did a lot of work but things just weren’t right. It was hard leaving her there again, but I’m glad I did – because this past weekend we went up again and completed the work and it’s made a huge difference!  Here’s a list of the stuff we accomplished:

    • Newly rebuilt 700R4 put in
    • Fix TV Cable bracket
    • Drive shaft adjustment
    • Change spark plugs
    • Reroute distributor plugs
    • Tune carburetor
    • Adjust/lash valves
    • Put in T-bolts for valve covers
    • Stabilize battery holder
    • Clean engine

    Grease Girl Under the Hood, engine tuning, hot rod, girl mechanic

    It was a lot of work, but a lot of fun! Especially with Bart and Lori by my side. Needless to say, I learned a ton through this process (such as How-To Gap A Spark Plug) and will be writing more to fill ya’ll in. I just couldn’t wait to share the good news.

    Driving Off Into The Sunset, grease girl, hot rod

    Each time someone’s head turns to see what’s making that awesome sound or wondering what’s under the hood of that old ’55 Studebaker, I can’t help but smile. I had no idea I’d grown this in love with speed (and with Stude of course!) This story ends happily with girl and car driving off into the California sunset…armed with more car knowledge, more horsepower, and of course more grease under her nails! Until next time, happy trails!

    The post Back In The Fast Lane! appeared first on Grease Girl.

    Viewing all 18 articles
    Browse latest View live